One of the biggest cats in the earth, leopards are known for their characteristic spotted coat. Despite their close resemblance to our household cats, you do not want to get upwardly close and personal with these majestic predators. What better way is there of celebrating these wonderful big cats than by cartoon them? In this like shooting fish in a barrel-to-follow leopard drawing tutorial, we help you create a realistic leopard painting in a few uncomplicated steps.
Table of Content
- i A Realistic Footstep-by-Step Leopard Drawing Tutorial
- ane.1 Step 1: Create the Master Body Shape
- 1.2 Step 2: Drawing the Leopard's Head
- 1.three Pace 3: Creating the Shape of the Leopard Face up Drawing
- one.iv Footstep 4: Connecting the Leopard'due south Head and Body
- 1.5 Pace v: Shaping the Leopard's Hindquarters
- 1.6 Stride half dozen: Constructing the Leopard's Front Legs
- 1.7 Stride seven: Drawing the Leopard'due south Dorsum Legs
- 1.viii Step viii: Constructing the Leopard's Tail
- 1.ix Step 9: Drawing the Last Leopard Outline
- 1.x Step 10: Information technology Is Time to Depict Leopard Spots
- 1.11 Footstep xi: Calculation the Beginning Glaze of Color
- 1.12 Step 12: Shading to Create Dimension
- one.13 Pace 13: Laying Down the 2d Color
- i.xiv Step fourteen: Adding Some Additional Shading
- one.15 Step 15: Calculation Last Colored Details
- ane.16 Step 16: Finishing upward Your Leopard Cartoon
- 2 Frequently Asked Questions
- two.one How exercise You Draw Leopard Spots?
- 2.2 Is Leopard Drawing Complicated?
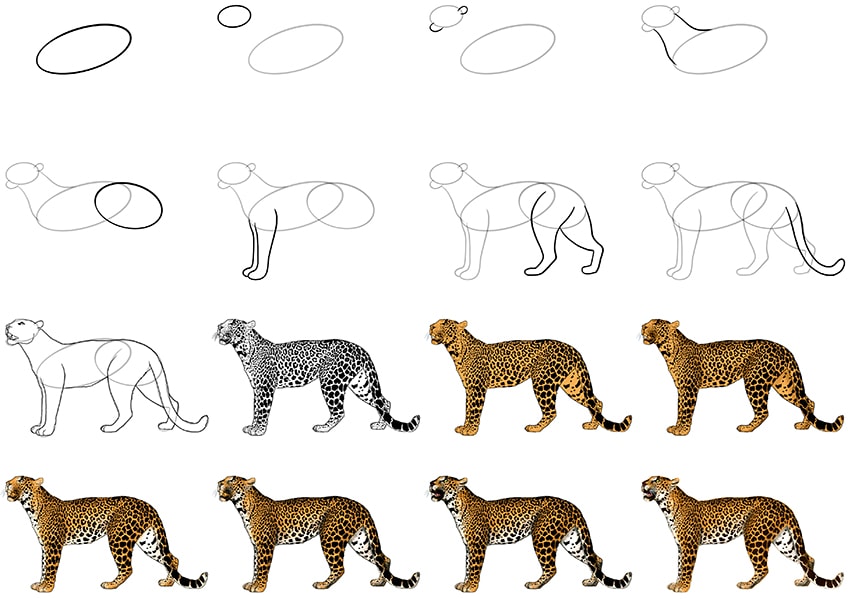
A Realistic Footstep-by-Pace Leopard Drawing Tutorial
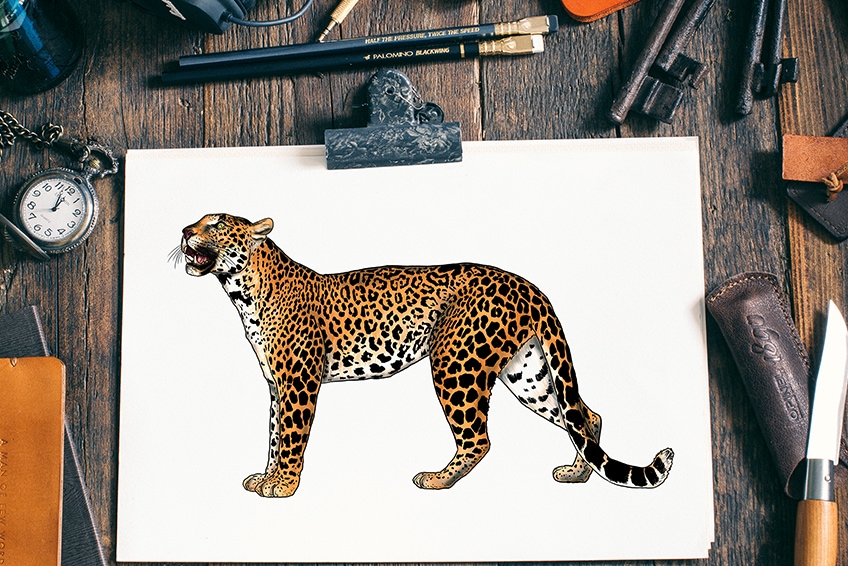
If yous looked at the thumbnail of this tutorial and thought that yous could not possibly describe such a realistic leopard on your start try, so, fortunately, you are wrong! We have designed our leopard drawing tutorial in such a way that any artist of any level tin easily create a realistic drawing of this large cat. We begin our tutorial with 8 construction steps that volition assistance you lay down the shape of your leopard earlier you begin adding detailing, texture, and color. Take a look at the step summary below.
When we become to the afterward steps where yous begin calculation color, the question of the medium comes into play. The tutorial is written in terms of a physical pigment medium, but the coloring steps are adaptable to a range of different mediums.
So whether you lot are a graphic artist or you prefer to work with coloring pencils, you can easily follow this tutorial and create a beautiful and realistic leopard drawing.
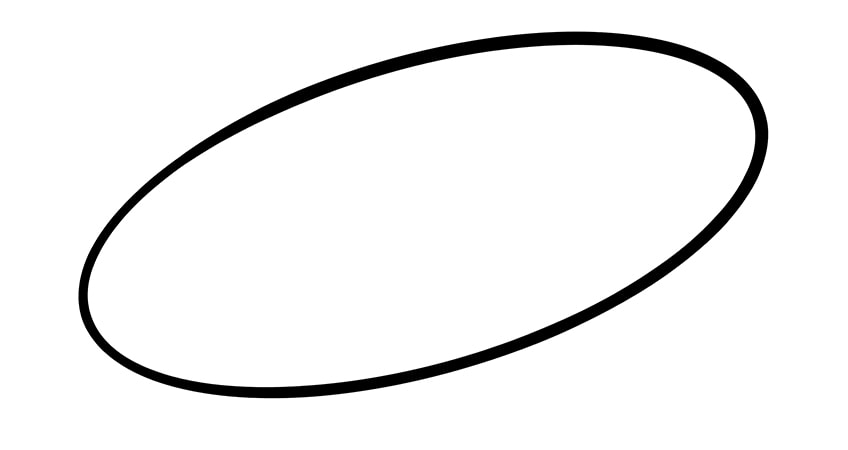
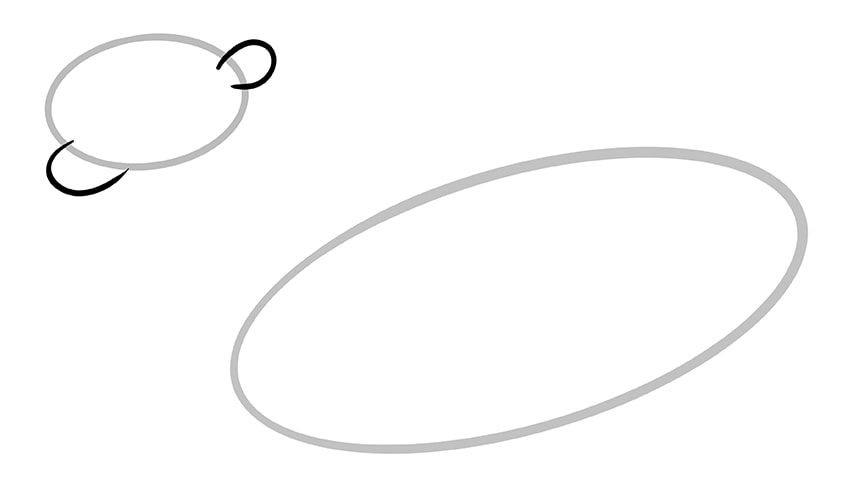
Step one: Create the Main Body Shape
To begin your leopard drawing construction, you are going to lay down the general shape of the largest part of the leopard's body. To do this, you are going to use a narrow elongated oval to represent the master body shape. Your main trunk oval should be slightly tilted with the right side beingness higher than the left.
As you lot begin this first step, make sure that your oval is in the very center of your canvas, leaving plenty of space for the leopard'south caput, legs, and tail.
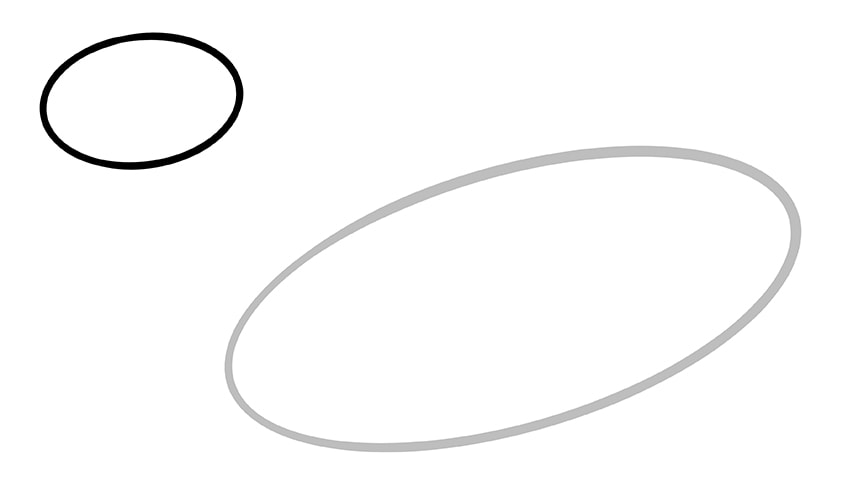
Stride 2: Cartoon the Leopard's Head
For the head shape, y'all are going to use some other oval shape as the base. The head oval should exist much smaller than the main body, and slightly less tilted.
Place the head oval on the far left side of the canvas, just above the highest bespeak of the main body oval.
Step 3: Creating the Shape of the Leopard Confront Drawing
In this step, you lot are going to create the shape of the ear and carve out the lower jaw of your leopard confront drawing. Begin on the top of the head oval, by drawing a small incomplete oval to represent the leopard's ear. Next, at the lesser left side of the caput oval, describe a slightly bigger incomplete oval shape.
This lower oval shape will correspond the lower jaw line that we volition use to shape the mouth in afterward steps.
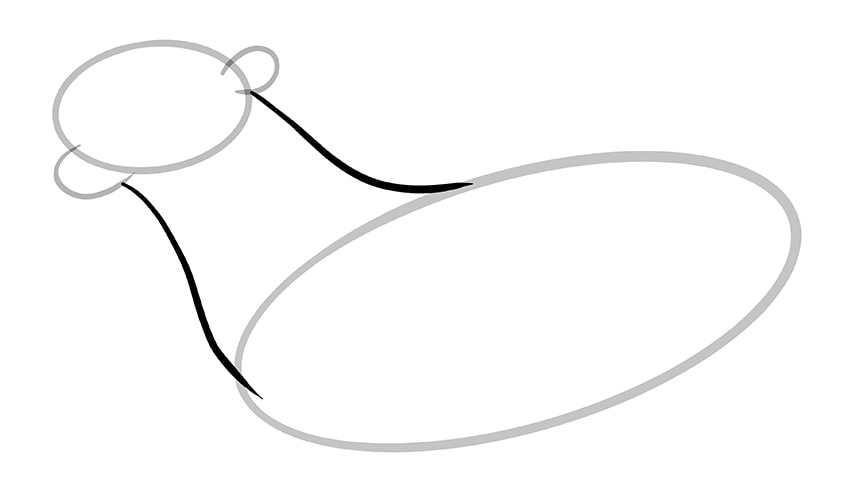
Footstep 4: Connecting the Leopard's Head and Body
In this step, yous are going to use the leopard's neck to join the caput and torso construction shapes. Begin with the upper neckline, starting from the bottom of the ear shape and curving downwardly to meet the top of the main torso oval.
For the lesser neckline, repeat the process beginning below the jaw shape and ending at the forepart signal of the main body oval.
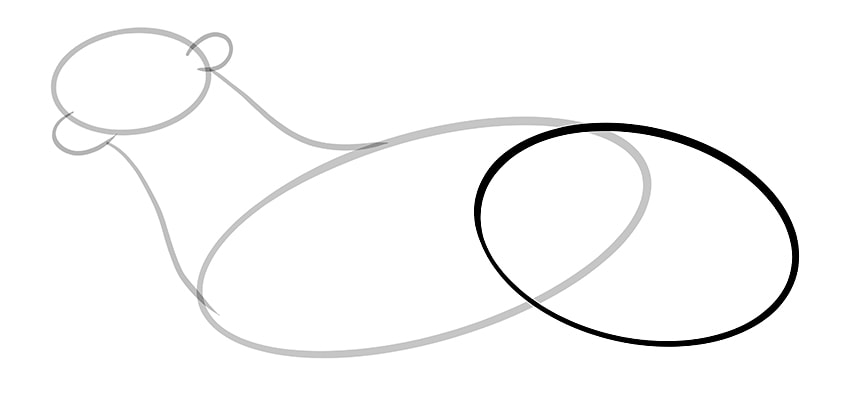
Footstep v: Shaping the Leopard's Hindquarters
If y'all take a await at the final drawing instance, you lot will see that the leopard's back slopes down. Before this step, the back of the leopard was raised compared to the chest surface area. In this step, y'all are going to depict another slightly smaller oval shape that tilts in the opposite direction to the principal body oval.
This back trunk oval should overlap the main body oval quite a lot.
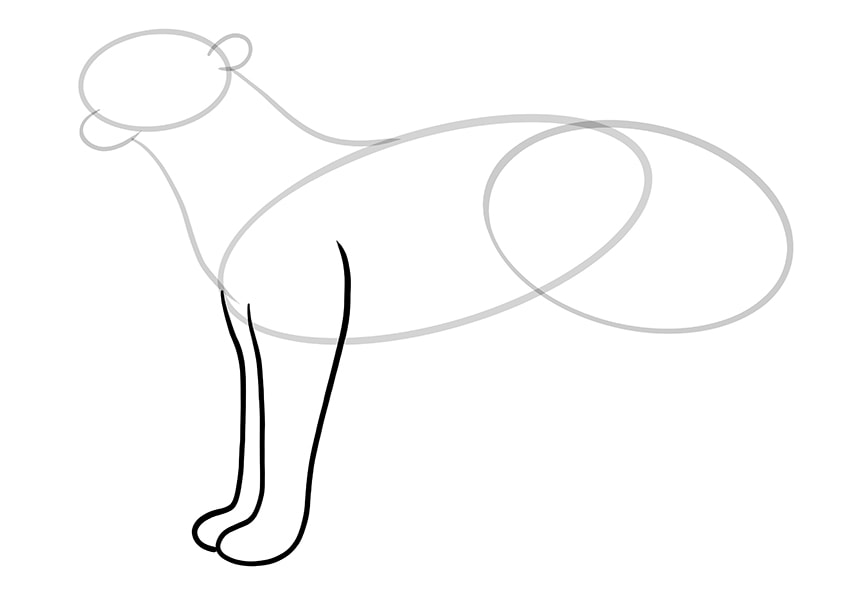
Footstep 6: Amalgam the Leopard's Front Legs
When it comes to drawing the leopard's legs, perspective is the well-nigh of import consideration. Because nosotros are viewing the leopard from side-on, the leg that is closest to us will obstruct the leg behind information technology. This is where construction lines shine because they can help us nail this perspective easily. Begin with the leg that is closest to us, taking a line down from inside the chief torso oval. At the bottom of this line, create a curved paw so bring the line back up to meet the principal body oval line.
For the second leg, just draw the front part of the leg beginning at the tip of the primary trunk oval.
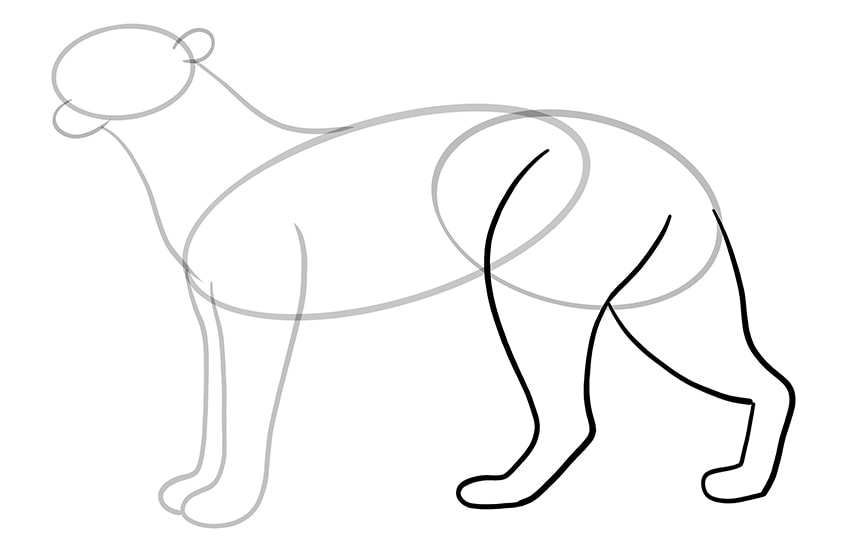
Step 7: Cartoon the Leopard'southward Back Legs
The back legs of your leopard drawing are quite different in shape from the front legs. They are likewise separated as the leopard is moving. Let u.s. begin, again, with the leg that is closest to the states. Start the leg line within the overlap between the chief body and back body ovals. Curve the leg line forwards and down, before creating a pes shape and so bringing the leg support into the rear body oval. For the 2nd leg, create a similarly shaped leg that is angled backward.
The second leg lines should brainstorm at the intersection of the commencement leg and the rear trunk oval and end merely higher up the back point of this oval.
Footstep 8: Constructing the Leopard'due south Tail
In our final construction step, you lot are going to create the shape of the leopard's tail. Apply a curved line that begins from the betoken where the back leg touches the rear oval.
Bring the line down and twist it up at the end, earlier curving information technology back to join the finish of the other leg line within the rear body oval.

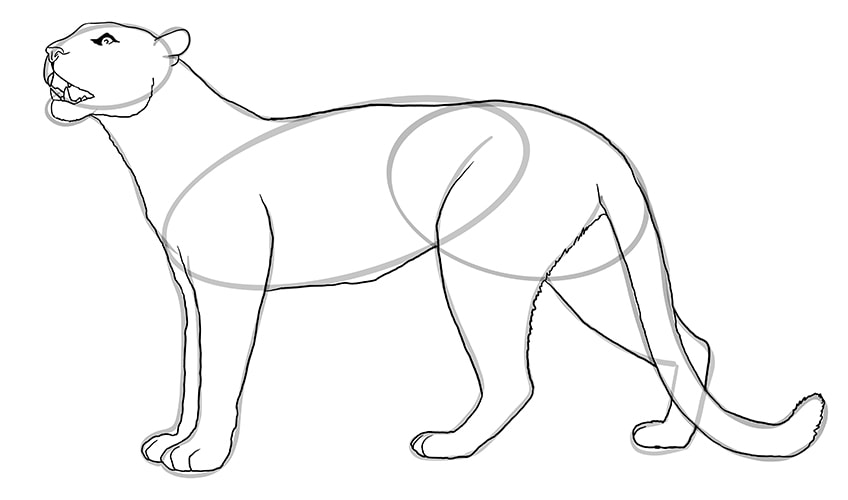
Footstep nine: Drawing the Last Leopard Outline
At present that we take laid down the basic shape of our leopard drawing, information technology is time to bring it all together and create the final outline. Brainstorm with the head, post-obit the construction shape merely also adding a few lumps and bumps to make it more than realistic. Draw in the nostril gradient and add in a strong jawline within the cervix construction.
Complete your head outline by drawing the central point of the oral fissure, making information technology appear to be open. Add some teeth details and draw in the leopard's nose and eye.
Below the ear, proceed to follow the construction lines across the leopard's dorsum and down around the tail. For the most part, you can follow the construction lines very closely. On the back of the hind legs and the bottom of the tail, utilise brusk little lines to create a fur-like texture. For the feet, create toe separations on the round pads.
Once you have finished your outline, you tin can erase all the remaining construction lines.
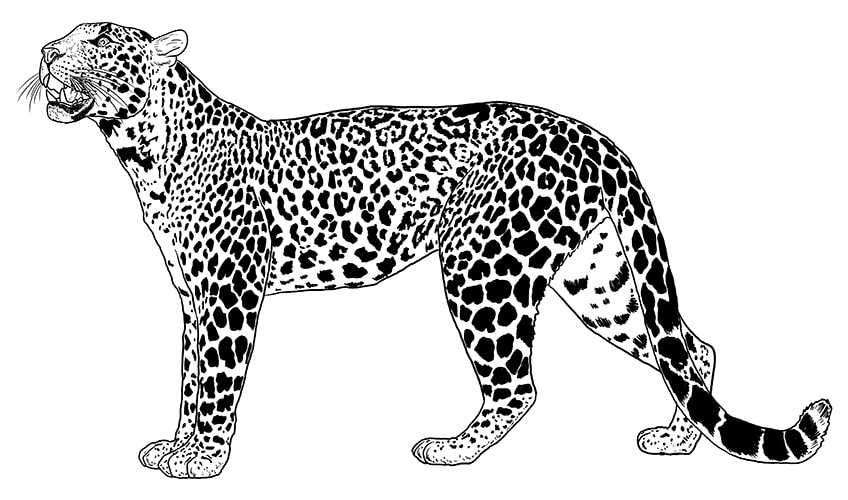
Step 10: Information technology Is Time to Draw Leopard Spots
It has now come time to draw leopard spots, the most characteristic feature of this beautiful large cat. Begin by adding texture to the leopard face drawing. Around the olfactory organ, add a series of dots and so some long whiskers. Add some black colour effectually the lesser jaw, and scribble a few lines to create a bearded texture. As you begin to move towards the dorsum of the caput and down the neck, you can start cartoon scribbled patterns.
The further towards the back and lesser of your leopard drawing you lot go, the larger these blackness spots should be.
When you depict leopard spots around the border of the body, brand them more curved to give the impression of them wrapping around the leopard's body. Cease this step by calculation pocket-sized line strokes around the toes and within the leopard's ears.
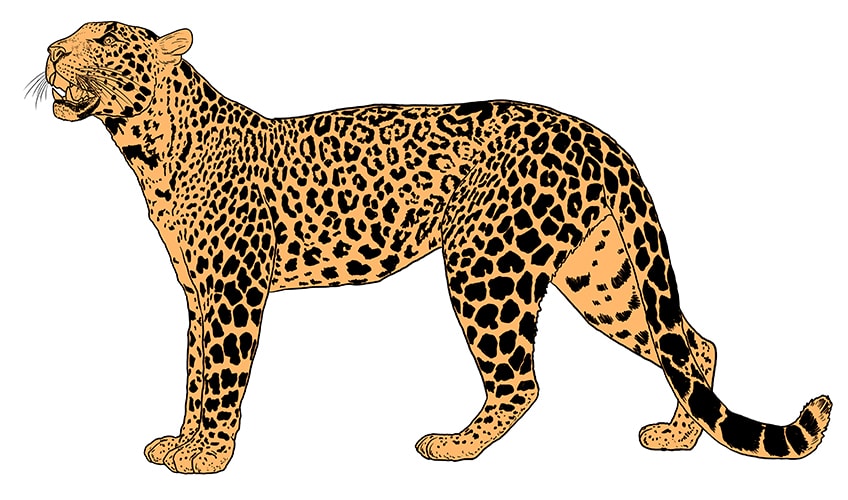
Stride eleven: Adding the Starting time Coat of Color
To go a realistic color on the leopard'south coat, we are going to build information technology up in a few unlike layers. Nosotros brainstorm with the base glaze of a lite brownish shade.
Regardless of the color medium that y'all are using, you want to ensure that this base glaze is even throughout the leopard's body.
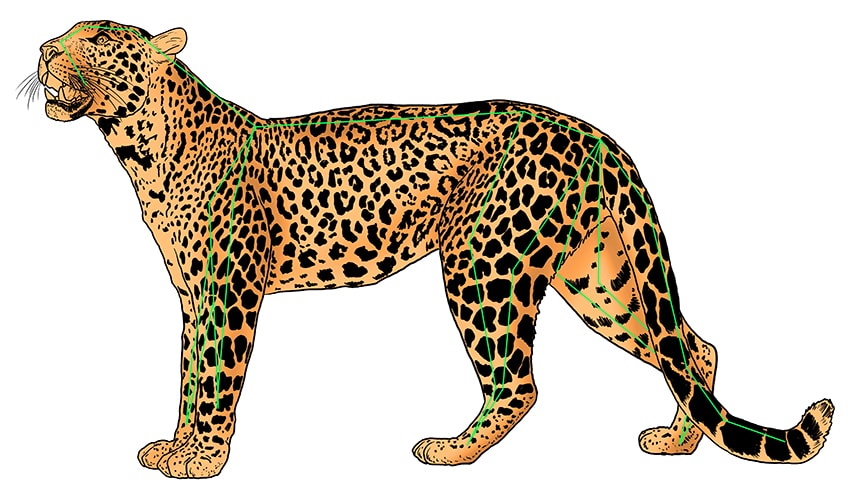
Footstep 12: Shading to Create Dimension
In this step, y'all are going to utilise a light touch of black to create shading throughout the leopard's body. Utilize a soft brush so that you lot can blend the paint well, and add a small amount of black to the mains structure of the leopard.

The paradigm below shows where you should place this shading, forth the tail, rear legs, front legs, cervix, back, and head. Only follow the dark-green lines.
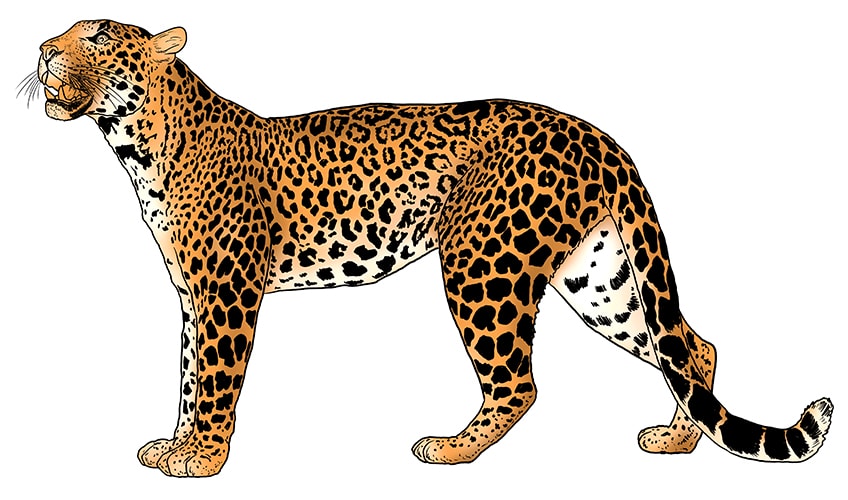
Step thirteen: Laying Down the 2d Color
The second color we are going to add to our leopard drawing is white. Choose a soft blending brush and add a coat of white paint to the inner thigh of the rear thigh and forth the bottom edge of the tail. Next, use the white shade to color the leopard'south chest, lower chin, along the front end leg, and on the belly.
Finally, finish this pace by adding another layer to the inner thigh and cheek area.
Footstep 14: Adding Some Additional Shading
In this step, we are going to add some additional shading to emphasize the shape and proportions of the leopard's torso. Once once again, utilise a soft blending castor with a touch of black paint to shade around the leopard's face and effectually the outline of the leopard'due south body as a whole. Trace any textures, like the toe lines and creases above the legs with black to add definition.
Finally, add a touch on of shadow within the ear to create a more three-dimensional impression.

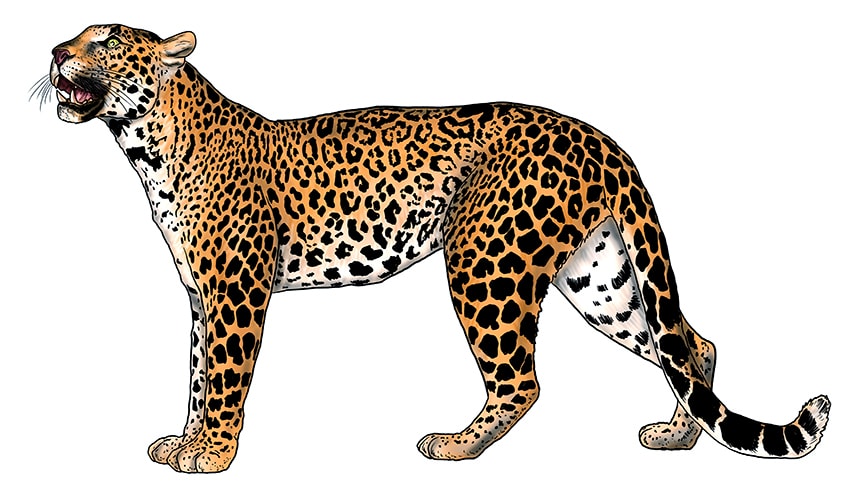
Step 15: Adding Terminal Colored Details
In this second concluding step, you are going to add some concluding coloring details to the leopard face drawing and the rest of its torso. Begin by using a bright green shade and a small castor to fill in the leopard's heart. To finish the eye detail, add a dot of white in the very center. Next, utilize a light pink shade to color the within of the mouth and the nostrils. Finish the leopard face drawing by using a touch of black to shade the mouth, nostrils, and inner ear.
Next, use the same soft castor and a little white paint to the areas around the face, emphasizing the eyes, whiskers, ear, and jaw.
Finally, finish the face details by using white to color the teeth. For the finishing touches, add together lilliputian dabs of white paint betwixt the patterns starting on the neckline and fading up from the belly.
Step 16: Finishing up Your Leopard Drawing
This final pace is optional but helps create a seamlessly finished drawing. What you need to do is simply erase the outlines of your drawing. You lot can do this in one of two ways, depending on the medium you have used. If you piece of work on a graphic tablet, so you lot can simply remove the outline layer. If y'all are working with a more concrete medium, and then you tin simply trace over the outlines with the corresponding color at each point.

Well done for successfully creating a realistic leopard drawing. You have learnt how to draw leopard spots and how to achieve realistic coloring. Hopefully nosotros will see y'all again shortly for another drawing!
Ofttimes Asked Questions
How do Y'all Depict Leopard Spots?
Leopard spots are not actually round circles just rather a pocket-size half-moon with a little spot inside. In our tutorial, we testify you exactly how to draw leopard spots in a realistic way.
Is Leopard Drawing Complicated?
As with all animals, it can be daunting to jump right in and begin drawing. For this reason, nosotros always begin our tutorials with a series of construction steps. These structure lines and shapes help us plan out the final outline of our leopard drawing, making it much more simple to draw.
DOWNLOAD HERE
How to Draw a Leopard Face Easy TUTORIAL
Posted by: brandonhischat.blogspot.com

0 comments:
Post a Comment